Friday, April 29, 2011

Lost in the Royal Mail


For some unknown reason, my invitation to the royal wedding of Prince William and Kate Middleton never made it to my front door. But, had I been invited, here's what I may have worn.

Of course, now that I have to stay home, I will probably be wearing something more along the lines of pajamas...and a tiara.

Wednesday, April 27, 2011

The Original Silly Bee's Bunny Cake


Finally-- a post about my famous (thanks to CakeWrecks.com) old-school bunny cake!  I was recently surprised to find my photo on a few internet sites that I didn't know about.  So, I thought I better claim it before anyone else does!


A little history:


The traditional bunny cake was invented by Baker's Coconut around 1970 when it was included in a promotional booklet (the 2nd in the series) of "cut-up" animal cakes.  As far as I can tell, the only one that really took off was the bunny. The hobby horse cake was not so popular.  Its demise may have something to do with the fact that you had to be an architect to figure out the blueprint.  Anyhoo, since then, there have been several versions of the diy bunny cake, but this one remains my favorite.


Here's how I make my signature bunny cake:


First, you'll notice she has no bow tie-- more on that later. What makes my bunny cake so cute (and perfect for a baby shower) is its soft colors, tiny eyes and big cheeks.  It's more Beatrix Potter and less Looney Tunes. Anyhoo, to make your very own, you need 2 round cakes, icing, flaked coconut, red & green coloring, black jelly beans (or chocolate chips) and a fork. 

Once you've cut out the shapes, trim one end of each ear and attach the ears to the head. Save the leftover piece of cake (formerly known as the bow tie) to eat while you're decorating-- that's where the fork comes in.

Before you ice the cake and go crazy dumping coconut on it, set aside about 1 1/2 cup of coconut to dye pink and green. Split the coconut in half and put each in a sealable container with a drop of food coloring and shake it up until it's evenly coated. You can add more drops as you go.

Next, ice the cake and immediately cover it with a generous amount of coconut. If you wait too long, the icing will set and the coconut won't stick. To make the nose, take a grape-sized amount of pink coconut and squish it together in your hands to form a little triangle. Add the candy eyes, and you are done!


Last year's bunny cake had little chocolate egg eyes.


This year I also made a choco bunny with chocolate sprinkles for the non-coconut eaters!


Click on the Betty Crocker Bunny Cake logo below to download a copy of their bunny cake booklet. The booklet shows you how to make the old-school bunny cake plus 3 others-- including cupcakes.


P.S. Don't be tempted by Bunny-shaped pans! Make it old-school and keep the tradition alive!

Friday, April 15, 2011

Silly Bee's Frankies- Babe Ruthless


It's Silly Bee's Frankies time! After creating my first franken polish, I decided it would be fun to give my frankies movie-inspired names. So, I chose Whip It, the roller derby extravaganza directed by Drew Barrymore as inspiration for my latest creation-- a gritty, glittery avocado green...


First, I started with 1 part Sally Hansen Diamonds and added very fine lime glitter. I found that it's best to mix glitter in a clear polish first before adding any other polishes. Then, I put about 4 parts Sinful Colors Show Me the Way and added 1 part OPI San Tan-tonio to give it a dirty tone. I wish you could see the shimmer in the photo below, it appears flat on my nails in the picture, but it's actually really dimensional. The Diamonds show off light pink, turquoise and yellow shimmer along with the lime glitter.


I'm pleased how it turned out. It perfectly accents the Hurl Scout's super cute unis. It's gravel-y, it's toxic, it's named after Ellen Page's Oink Joint waitress turned derby doll character. Without further ado...


Presenting 
Babe Ruthless


Babe Ruthless Formula


This is Silly Bee's Babe Ruthless Frankenpolish Formula


.

Thursday, April 14, 2011

Paper Carnation Corsages


I made these cute carnation corsages for my mom's party, Queen Bea's Birthday Jubilee.  All the guests wore yellow ones and I made matching white ones for the hostesses to complement their yellow blouses.  These are perfect for an afternoon tea party or bridal shower.  Wouldn't they look so cute in shades of pink or blue for a baby shower?  Or for all the moms at church on Mother's Day?

They are a bit time consuming, especially if you have to make a whole bushel of them, but they aren't difficult to make and the result is well worth it!  They are so much nicer than regular ol' grocery store carnations.  So, without further ado, on to the how-to!  hee hee


Set it up!


To make the corsages, you'll need cardstock, tissue paper, scissors, glue, two kinds of ribbon no more than 1" wide-- with one slightly wider than the other, twist ties and bumble bee stickers. Start by cutting two 3" circles out of cardstock.  You can use a small cup to trace the circle or use a circle cutter.


Back it up!


To create the backing, take your ribbons and cut two lengths of each about 3" long.  Trim the ends diagonally to form the tails.  Glue the ribbons onto one cardstock circle layering the narrow ribbon on top of the wider one.  Glue the other circle on top lining it up with the circle underneath.  Easy peasy.


Fold it up!


On to the flower...  Cut six sheets of tissue paper into 5"x7" rectangles and make a neat little stack.  Starting at the short end, fold the paper back and forth in an accordion fold about 3/4" wide. 


Next, take your scissors and cut little triangles in the middle of each folded side.  Wrap the twist tie snugly around the notches keeping the ends of the twist tie to one side.  Trim each end into a scallop or v-shape.


Fluff it up!


Unfold each half of the flower like a fan.  Holding the twist tie, lift the top tissue away from the others and pull it towards the center of the flower.  To make room for each layer, gently un-tuck the petals all the way down to the base using your thumb and forefinger.  If you accidentally tear one, don't worry-- the other layers will hide it.

Continue separating each layer in one direction so the flower has a flat bottom.  Leave the last couple layers of tissue together so you have a sturdier base to glue to the backing.


Finish it up!


Next, fold the twist tie flat against the flower and glue the flower onto the cardstock backing.  Add a little bumble bee sticker and you're done!  Use corsage pins to wear the carnations.  Soooo cute!

For an extra-special touch, you can personalize each corsage by putting an initial letter sticker on one of the tails like a homecoming mum!  In fact, how cute would these be with little football stickers for booster moms at homecoming?! Oooo-- with stickers for the player's jersey number!


Featured on:
mothers day

Linked up with:
Tip Junkie's Tip Me Tuesday
Running With Glitter
Don't Waste Your Homemaking

Thursday, April 7, 2011

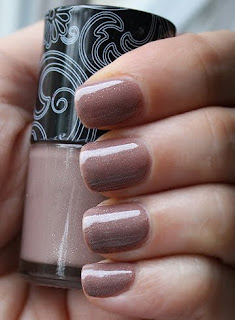
Silly Bee's Frankies- Roux's Chocolat


Somebody stop me!  I've joined the franken craze!  (The nails kind, not the monster kind.) Frankening is a funky new word for something we've been doing for ages: mixing nail polishes.  In high school, I used to mix polishes to get the perfect sheer for French manicures.  Nowadays, nail polish aficionados are not only mixing colors, but adding makeup pigments, glitter and iridescent flakes to their frankens.  It sounded so fun, that I decided to give it a go...


For my first franken, I wanted a go-to neutral with a little shimmer.  I started with OPI's You Don't Know Jacques and added Essie's Mambo.  Mambo added a rose undertone which is really pretty in sunlight.  Sally Hansen's Diamonds created just the right amount of sparkle which added dimension to an otherwise boring neutral and Sheer Me Now lightened it up and brought it all together. The final mix ended up being just about equal amounts of each polish.


Presenting 
Roux's Chocolat!
Named after Johnny Depp's character in the fabulous movie co-starring Juliette Binoche.


This is Silly Bee's Babe Ruthless Frankenpolish


Roux's Chocolat Formula
 
This is Silly Bee's Roux's Chocolat Frankenpolish Formula


For a great tutorial on frankening, read Frankenpolish 101 on Dr. Frankenpolish's blog.  A couple tips: wear gloves while you are working so you don't mess up your manicure and keep a pen and paper handy to keep track of your formula. Don't forget to name your frankies and keep your recipe with your nail polish stash. You just might need to make some for your bff so she'll stop stealing yours!

Look for more Silly Bee's Frankies in the future!  I'll be sharing them with you as I make them.  In the meantime, google "franken polish" and check out some other beautiful creations!  Do you have any favorite franken formulas?