Showing posts with label Christmas. Show all posts

Friday, December 28, 2012

Do You See What I See?

 
Can you identify all the holiday show/movie references?
(Click photos to enlarge)


Happy Holidays from Silly Bee's Chickadees!

Wednesday, November 21, 2012

Trendy Tree, Yippee!

So.  I was looking for a particular glittery curly spray that I used in my homecoming centerpiece to show you where you could find it online, if not at Hobby Lobby andddd I found it!  But even more awesome is where I found it...the cutest Christmas decorating online store evah-- Trendy Tree


Trendy Tree has a bunch of unique thingamajigs and doodadswhatchamacallits and doohickies, thingamabobs and whatsits to decorate your home for the holidays and I love it all.  They have everything from fun, bright funky stuff to very elegant traditional pieces.


The most awesome part is that their designers have created beautiful trees with their products and listed the different pieces-- and quantities used-- so you can buy them all at once and make their tree your own!  How cool is that?  Once you have the pieces you can use their photo as a guide to put it all together and brag to the neighbors.  Presto! You are now the envy of the block. 

Now THAT's and awesome find.  You're welcome.

Oh, and about the centerpiece, stay tuned...

Thursday, November 1, 2012

Dollar Store DIY- Chalkboard Tray!


Gather your Materials


  • Silver metal tray from the Dollar Store (it looks like the real thing!)
  • Chalkboard paint (or spray paint)
  • Ribbon
  • Flat, wide paint brush
  • E6000 (or hot glue)
  • Tape
  • Scissors
  • Chalk!

Let's Get Crafting!

Prime the tray by wiping it down with some Windex or rubbing alcohol.  Let the tray dry.  Now, pull out your chalkboard paint and shake, shake, shake!  The stuff tends to separate, so shake it good!


Tape around the inner edge of the platter making sure to press the tape down firmly on the edge where the paint will meet so none seeps under.

Use a flat wide brush and in long even strokes, gently drag the brush across the tray in one direction. Don't go back and forth over it, even if there are bald spots, or you will mess up the smooth finish.  Wash your brush and let the tray dry for at least one hour before adding a second coat. 

Once you're ready for another coat, shake the bottle again and paint another layer across the tray perpendicular to your last coat.  Remove the tape carefully and let the tray dry for at least 24 hours before you touch it.


While the tray is drying, make your bow.  I used wire satin ribbon, but any ribbon will look nice.  Don't worry if it isn't perfect at first.  Just tug at it a bit until the loops look the same size and trim the tails to even them up.  For a finishing touch, I always put Fray Check on the cut ends of ribbon.


You can glue the bow on with hot glue, but I'm pretty much an E6000 girl.  So, I added a bit on the back of the bow and attached it to the tray holding it together with a binder clip. 


When the board is ready, you'll need to "season" it.  Take a piece of chalk and gently rub the side of it on the entire black surface.  Then, use a tissue to wipe it clean. 


Ta daa!  Your board is ready for a dozen different uses.  Use it as a message board, menu board, inspiration board, or maybe to leave a message to Santa.  Plus, it's magnetic!  I'm using mine as a menu board for our tailgating tent on The Boulevard.  More on that to come. 


Monday, December 6, 2010

A View from the Tippy Top


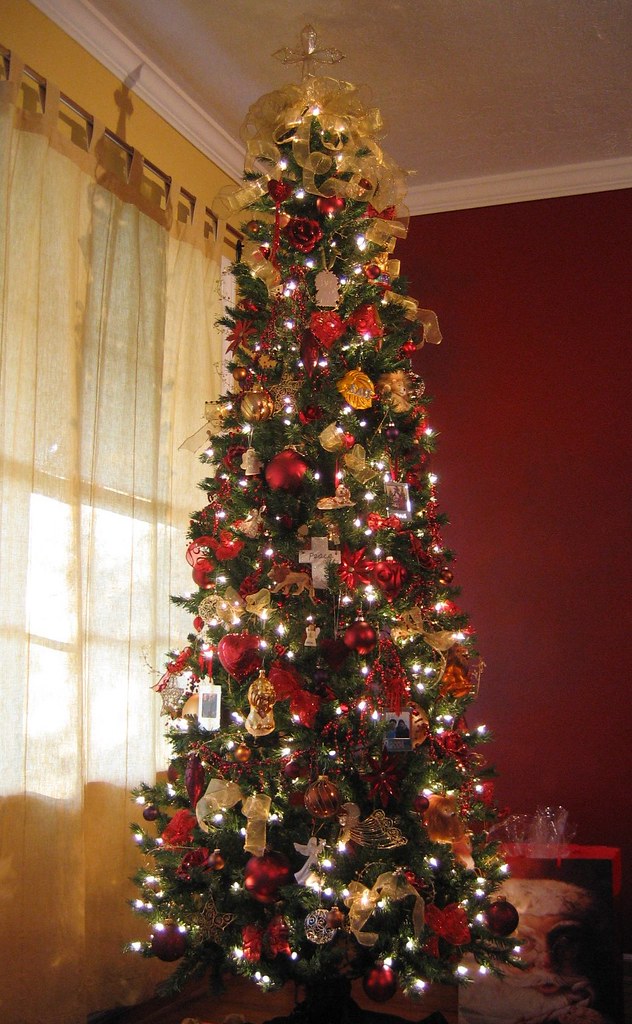
I love decorating my Christmas tree and I often get lots of compliments on it!  I think one of the things that makes my tree look so "put together" is its crown-- the tippy top.  A tree just isn't a Christmas tree without a topper.  My tree is very narrow and my ceilings are pretty low, so I can't make a fabulously grand crown with fruit and ornaments and giant angels, but I can still dress it up-- and you can, too.

You don't need to be a fancy designer-- just a cool chickadee with a couple designer tricks up your sleeve. I've never taken decorating classes or anything, I just pick up ideas whenever I see a beautiful tree at a department store, in a magazine or in a catalog and I have a whole file of clippings to prove it!  So, I thought I'd share an easy way to fancify your tree top featuring an awesome trick that I came up with on my very own.  Enjoy!


Step 1: Gather the Materials


Once you've chosen your theme and color palette, shop for pretty wired ribbon about 3" wide (think grand!) and some glittery floral picks, branches or anything you can add that will coordinate with your trimmings. The best "extras" have long stems that you can just stick into the tree without having to wire them on. Buy 4 or 5 spools of ribbon-- it's always better to have extra than not enough. And you probably don't want to have to run to the store mid-trimming only to find out it has sold out of your ribbon!


Step 2: Make the Bows


(click image to enlarge)

To make a topper like mine, you need 3 or 4 large bows. I make multiple-loop bows with 4 or 6 loops-- depending on the thickness and width of the ribbon. These bows are about 10" wide with 10" tails cut on a diagonal. I prefer shorter tails that don't hang all the way down the tree, but just enough to curl nicely at the top. That way there's more room to show off ornaments. If you need instructions on making multiple-loop bows, check out this Container Store tutorial-- that's basically how I make mine, but I don't do the little loop at the beginning.  The center of the bow won't show anyway so there's no need to hide the wire.  If you look closely at that second picture above, all I do is pinch the center and wrap it tightly with wire.


Step 3: Assemble the Hoop


(click image to enlarge)

Shh, here's the best part-- my super-secret McGuiver-style tree-trimming trick.  This technique allows you to attach all the bows to the tree top while keeping the top branch free for Grandma's favorite angel topper. All you need is an inexpensive embroidery hoop and some wire, pipe cleaners or twist ties. Use the wire to attach each bow to the hoop, then fluff up the bows.  Taddah!  You've just created a gorgeous bow topper that you can reuse year after year!


Step 4: Crown the Tree


Now, all you have to do is place the hoop around the tippy top and let it sit on the top branches. Step back, walk around the tree and adjust the hoop so it sits properly and doesn't lean to one side.  The top branch is now free to add your own tree topper!


Step 5: Dress the Tree!


(click image to enlarge)

Along with the giant bows, I try to find some fun sparkly extras to stick up at the top to draw the eye upward. I found these super cool picks that have curly wire covered in brown sequins. They came as tightly wound coils, but you just stretch them to make cute boingy spirals.  You can either stuff your picks into the bows so they stick up, or under the bow so they hang down. Since my sequined picks were bendable, they looked best cascading under the bow.

Finally, you can add your traditional tree topper to the tippy top like I mentioned before, or just fluff up the bows to hide the top branch. Voila! You have a beautimous tree top and all your friends will think you had it done professionally!

When you are ready to store your decorations, find a box that is big enough to hold your bow hoop without crushing it and use scrunched up tissue paper inside each loop to keep the ribbon from creasing. You'll be glad you did next year!


Check out these fabulous tree tops by truly talented ladies. Thanks for allowing me to share your pics, chickadees!


click on Sue's photo to read her post


click on Annette's photo to read her post


Kraphti Dez's amazing over the top tree toppers


Special thanks to Annette at netteandjimmy.blogspot.com, Sue at ineedmom.blogspot.com, and Kraphti Dez

Friday, December 18, 2009

The Photo Shoot That Wasn't

We had high hopes. I really, really wanted it to be a good little photo shoot, but it just wouldn't behave. It was a sad, exhausting attempt at wrangling Molly and Max so we could take our family Christmas card photo. There we were, under hot lights, sweating in our formal attire trying to direct our own photo shoot...with props...and dogs who don't understand direction. Half of the time, Molly and Max would split just before the camera timer would run out! Finally, Max was done. He refused to come out from under the bed. So, we gave up and are doing a re-shoot tomorrow. I am determined to get this card out before the new year!!! Please to enjoy!


Friday, December 11, 2009

The Tree is Up!


(click image to enlarge)


Christmas has finally come to our house. The tree is up! If it weren't for the Angel Party, it probably wouldn't be up for another week! The party was last weekend and although it was hectic getting it all together so soon after Thanksgiving, it forced me to get my decorations up. Now, I can sit in front of the tree with a blanket and a cup of Mexican hot cocoa!

This year's tree is red, gold and brown. It combines most of the colors of my 2007 tree, red ornaments and some metal roses from Mexico. I've had those quite some time, but it's been a while since I've decorated with them.


(click image to enlarge)

I also have a new lion ornament! Every year, I go to Neiman's and buy one fancy ornament for the tree and I was pretty excited that they had a toy lion ornament. I love that they have the signature NM butterfly and year tags on each of their ornaments. The butterfly on the tree is in memory of my Grandma Clara and the gold cross is from my sorority sister, Candy.

I'm really pleased with this year's tree and I hope you enjoy it, too.  Have fun decorating yours!

Wednesday, December 9, 2009

Parade of Trees

I was recently looking at old Christmas photos and thought a tree parade was in order since I haven't shown them off before (they were pre-blog).  Soooooo, put on your woolies and mittens, pack a Thermos of hot chocolate, find a prime viewing spot and enjoy!

2006 Tree


click to enlarge


2006 was our first Christmas in our first house.  I was so excited that we finally had a "proper" Christmas tree room instead of our den/living room/dining room in our apartment! 


We bought a tall thin artificial tree so it would still look full with the few ornaments I already owned.  I had been collecting lions--my sorority mascot-- since we got married and had a handful of red heart ornaments, but that was it.  With just a couple boxes of red balls, I had enough trimmings to cover the entire tree.  So, the first tree was the "Red and Gold, Lion and Hearts Tree".  I thought it really looked nice in our newly painted living room with dark red and gold walls.  I added Michael's C3PO ornament since it matched!

2007 Tree


click to enlarge
 

In 2007, I decorated the tree with my lions, ornaments in shades of gold, copper and brown and animal print ribbon.  I also added 4 new lions to the tree.  When I put away my Christmas decorations, I separate the tree trimmings by color and store them in big tubs.  That way, it's easy to pull out just the colors I plan to use.  This time, the red box stayed "up stairs".


I always match my gift wrap to the tree and I found some beautiful metallic paper and flocked paper at Container Store that I mixed with different bows and ribbons.

2008 Tree


Last year, I was shopping and saw some gorgeous blue ornaments with brown and gold accents, so I decided to go with those colors for the tree and wrappings.  I used all my lions and gold ornaments and added some blue glass balls and jeweled ornaments.  It was an unusual, but very pretty color combination.  I think when I do this one again, I'll add some blue ribbon.


I also added a new lion, which I bought at the London production of The Lion King musical.  I just love it.  It gets a prime spot near the tippy top!

So, there you have it!  A parade of Christmas trees past.  Hope you enjoyed the show!

Tuesday, December 1, 2009

Season's Greetings, A La Mel & Mike!

Every year since we moved into our new house, I've sent out photo Christmas cards featuring my coocoo bananas take on fancy traditional family portraits.  I wanted to share them with you since the first two photos were taken before I started my blog.  I've had friends tell me that they look forward to getting our card each year and others who display them on their refrigerator for the whole year! You can see last year's card here, inspired by the Most Interesting Man in the World. Click on the photos to enlarge.


Season's Greetings from our new home to yours
Melissa, Michael, Molly and Max

2006


Season's Greetings from The Garza-Allens
of the Houston Garza-Allens
Melissa, Michael, Molly and Max
2007

Monday, November 23, 2009

Gingerbread House


Once upon a time, I made a gingerbread house for a contest only to find out that Wilton decided not to host a gingerbread house contest that year! Pooh! Anyway, contest or no, I still have an awesome gingerbread house and love to show it to friends.


Well, imagine my delight when I found out that Martha wants to see our gingerbread houses and she's having a contest for the best one. So, of course I uploaded my photos to her site and am hoping she'll love them.


Everything on the house is edible, only in theory, and all the decorations are made of fondant. They are pretty much rock hard now and the house weighs a ton!


Update: Not sure whatever became of the Martha contest, but my little house was featured on the Food Network Canada blog!  Awesome, eh?


Friday, January 23, 2009

Fiesta Fridays- My First Invitation


Welcome to the first installment of Fiesta Fridays. Today is all about invitations! If you know me, you know that making invitations is one of my favorite things to do. I could go on and on about them and have dozens of ideas, but we’ll just start with the first handmade invitation that I ever made. It was for a Christmas party and that probably doesn’t help you all that much this month, but maybe you can bookmark this post and come back to it in November!

Rewind to the first party I ever threw, that is, the first non-birthday, non-gift-related party. It was in the 3rd grade and it was the premier event of the holiday season…a caroling party. I created the invitations, made the guest list and planned the evening with the help of my gracious mom. After gobbling holiday snacks and sipping hot chocolate on a less than frosty night, we went caroling at everyone’s houses. Then, when we returned, we worked on a puzzle while we waited for the girls’ rides home. This was my first dalliance into the world of social event planning. I’m telling you, I love this stuff. I think the party was a success because caroling is a novel activity that most people in Houston never do (it may have something to do with the 90% humidity and 70 degree weather). Here is the glorious invitation that I created from scrap paper and crayons. As you can see, I omitted one of the most important details: the location. But, I did consider the girls’ safety and encouraged them to bring their flashlights. Seriously, chickadees, I was in 3rd grade! Please to enjoy…


So. Invitations. Basically they bring all the boys (and girls) to the yard. You may get some gracious guests to your party, after all, you are fabulous! But if your invitation is boring, chance are you won’t get any blown-away, uber-impressed, I’ll-just-die-if-I-can’t-go-to-this-party revelers (not a real word, I know). Formal printed invitations are lovely, fill-in invitations are quick and email invites can be cute and practical, but I think a fun handmade invitation really sets the scene for fabulosity. Sometimes, I follow a mailed invitation with a fun email a week before the event. That way, people can access the party location with their internet devices if they’ve forgotten their invitations on the way over. At any rate, handmade invitations rock, in my party book.

You don’t have to be an artist or designer. Just do a bit of brainstorming to come up with your theme and some fun ways to give your guests a taste of what’s to come. If you’re throwing a birthday party, call it a “Birthday Blow-out” instead and put some balloons in the invitation. If you’re throwing a Valentine dinner, call it “Hearts Afire” and tuck a tiny folded invitation inside a matchbox. You get the idea.

Back to the caroling party. You are free to copy my super fab caroling invitation circa 1981, or you can try one of the following that I came up with just for you. If you are going to pass out the invitations at your child’s school, print the info out on a sheet of paper and mount it on a sheet of Christmas music, roll it up, then tie it with a pretty ribbon. You can find an inexpensive Christmas music book and tear sheets out of it. My sheet music is from my piano days when I was little. The second photo shows a cute invitation that you can easily make and pass out to friends. Just buy some hot cocoa mix and some inexpensive mittens and stuff them into a cute Christmas bag with the party invitation. Voila! A fun, you-don’t-have-to-be-an-artist way to create a Come All Ye Faithful invitation!


You can easily adapt the last idea with other party themes. Just head on over to Party City or the dollar store or shop online at Oriental Trading Company to pick out some trinkets to toss into your goodie bag or box. Ooooo, here’s an idea—have a mystery party. Use brown lunch bags, make a plain party invitation on white paper (have everyone meet at your house so they don’t know the final destination) and throw in some trinkets to give the guests hints of the theme…white socks, little kids’ plastic bowls and a packet of relish…you’re throwing a bowling party and serving hotdogs! The possibilities are endless! Have fun!

This party was featured on Tip Junkie!

Sunday, January 11, 2009

Angel Party- Part II


I am proud to announce that we collected 20 Barbies at the 2008 Angel Party! While we were considering the lucky recipient of our ginormous gift, my fellow Angel Party hostess Mary, contacted Spaulding for Children on a mutual friend's suggestion. Spaulding is a nonprofit agency that helps children with physical and emotional disabilities and those who have been abused or neglected. They have programs and resources for families in foster care, adoption and post-adoption stages. It just so happens that Spaulding has a room that parents (foster or adoptive) can visit to pick out gifts for their new family members to help the children feel comfortable in their homes. And get this, it's called the Angel Room! Serendipitous, wouldn't you say? What a fun discovery made possible by a gentle nudge from above! Mary and I were so excited when we dropped off the Barbies at the Spaulding office. The staff was gracious enough to let us check out the Angel Room (there were no clients there that day.) And they were so excited to see our Barbie dolls; we are all children at heart after all!


The great news is now we have a perfect partner to help get the Angel Party toys into precious little angel hands. Because they collect gifts for children and youths of all ages, we can choose a different theme every year as we normally like to do.

I know I can speak for Mary when I say we really wanted to find a recipient where our gifts could really make a difference and not an agency that gets thousands of gifts during the holidays. We are so blessed to have learned about the Angel Room because our gifts will serve a higher purpose for families in our community. Not only will they put a smile on a newly fostered or adopted child's face, but they will in a small way, help new parents make important bonds with their new family members.

Thank you, Spaulding and all the 2008 Angels! And to Barbie for being so cute!


P.S.- The snowflakes hanging from the ceiling in the snowman picture represent dollar donations Spaulding received during their Blizzard of Giving. They received so much money that they ran out of snowflakes!