Hello, Chickadees!
The first Krafty Kit, the New Creation travelers journal broadcast was so fun! I really enjoyed the fellowship and creativity that came out of the afternoon of crafting.
If you purchased a kit and were unable to participate in the live workshop, you may now replay the scopes to complete your projects at your own time. If you are interested in purchasing a kit for this project, check back in April when I will list a few kits in my etsy store.
Enjoy!
PART I:
PART II:

Showing posts with label crafts. Show all posts
Showing posts with label crafts. Show all posts
Wednesday, March 2, 2016
Sunday, January 17, 2016


Tuesday, January 5, 2016
Tasselpalooza Pom Pom Periscope Party!
There's a party goin' on right here! Check out yesterday's scope tutorial. You'll be glad you did!
Saturday, January 2, 2016
Thursday, December 31, 2015
Mini Bible Journaling Periscope Giveaway!
Mini Bible Journaling Grab Bag Giveaway!
Thanks for welcoming me on periscope! I thought it would be fun to give away a couple little grab bags with some scrappy bits, a bookmark, AND a mini bottle of Silly Bee's Polish!
Enter to win!
Giveaway ends Friday night.
Giveaway ends Friday night.
Saturday, December 26, 2015
Get set!

Ingredients:
- Scrapbook paper-
- 2-3 sheets of a floral print
- 2-3 sheets of coordinating paper of a light color (pale yellow, light blue, pastel pink, etc.)
- Notebook paper or graph paper- just a few pages, you can tear them right out of your spiral :)
- White acrylic paint- any craft acrylic will do
- Watercolor pencils
- A few different coordinating washi tapes- I used black and white stripes, a gold stripe, and black glitter.'
- Black pen (I use Sakura Micron and Prismacolor Premier Pens, both you can purchase in sets or individually.
- Fine paintbrush
Extra stuff:
- Paper towels or facial cotton pads
- A little dish of water
- Scissors
- A sheet of plastic to place between pages
- Glue- preferably Aleen's Tacky Glue
- Your fingers- this is a little messy!
See you next week! Can't wait!


Tuesday, December 22, 2015
Get Ready!

Hello, creatives!
I'm planning on broadcasting the tutorials for this layout next week on periscope while I'm on Christmas vacation- date and time tbd. I'll be recreating this design style on the back inside cover end papers, but don't feel that you need to have a journaling Bible to participate. You can work in a hymnal, a blank journal, or even on a separate piece of card stock to hang on your gallery wall!
The tutorials will be in two parts. One for the background and one for the embellishments and both will be uploaded to my blog afterward. The materials list will be posted in a few days if you'd like to follow along and create with me!
Merry Christmas!
Melly
Thursday, November 1, 2012
Dollar Store DIY- Chalkboard Tray!

Gather your Materials

- Silver metal tray from the Dollar Store (it looks like the real thing!)
- Chalkboard paint (or spray paint)
- Ribbon
- Flat, wide paint brush
- E6000 (or hot glue)
- Tape
- Scissors
- Chalk!
Let's Get Crafting!
Prime the tray by wiping it down with some Windex or rubbing alcohol. Let the tray dry. Now, pull out your chalkboard paint and shake, shake, shake! The stuff tends to separate, so shake it good!

Tape around the inner edge of the platter making sure to press the tape down firmly on the edge where the paint will meet so none seeps under.
Use a flat wide brush and in long even strokes, gently drag the brush across the tray in one direction. Don't go back and forth over it, even if there are bald spots, or you will mess up the smooth finish. Wash your brush and let the tray dry for at least one hour before adding a second coat.
Once you're ready for another coat, shake the bottle again and paint another layer across the tray perpendicular to your last coat. Remove the tape carefully and let the tray dry for at least 24 hours before you touch it.

While the tray is drying, make your bow. I used wire satin ribbon, but any ribbon will look nice. Don't worry if it isn't perfect at first. Just tug at it a bit until the loops look the same size and trim the tails to even them up. For a finishing touch, I always put Fray Check on the cut ends of ribbon.

You can glue the bow on with hot glue, but I'm pretty much an E6000 girl. So, I added a bit on the back of the bow and attached it to the tray holding it together with a binder clip.

When the board is ready, you'll need to "season" it. Take a piece of chalk and gently rub the side of it on the entire black surface. Then, use a tissue to wipe it clean.

Ta daa! Your board is ready for a dozen different uses. Use it as a message board, menu board, inspiration board, or maybe to leave a message to Santa. Plus, it's magnetic! I'm using mine as a menu board for our tailgating tent on The Boulevard. More on that to come.
Thursday, August 30, 2012
Pearl River? Yes Please!


So, this is my awesome find of the day, or month or whenever I find another awesome thing. You're welcome.
Wednesday, May 2, 2012
Frosted Tissue Paper Roses

Ingredients:
- Tissue paper flower-- try this one.
- Spray adhesive
- Clear glitter
Directions:
- Spray flower with the adhesive.
- Sprinkle on glitter.
- Shake off excess glitter.
- Done.
- Simply gorgeous.
Wednesday, April 11, 2012
The Faux Milk Glass Hobnail Votive

Everyone is painting the inside of glass bottles. DIY tutorials abound! This is my little version.
I love hobnail milk glass. It's loverly. It's delicate. It reminds me of Grandma. It's perfect for bridal parties, high tea and all things girly and frou frou-y. It's also pricey. Unless you fake it.
Ingredients:
- Hobnail glass votive candle holder (Michaels, Hobby Lobby, Dollar Store, thrift store)
- Acrylic or enamel paint in a pale color. (My votives will hold tissue paper flowers and don't need water. So acrylic paint is just fine. Plus, I plan to reuse them, so the paint needs to be removable.)
- Paint brush and plastic plate

Method:
- Wash the inside of votive and make sure there's no wax inside (especially along the sides). I suggest wiping it down with rubbing alcohol or nail polish remover. Let dry.
- Use a paint brush to paint the inside of the glass. Air dry completely before applying a second coat. You can also pour the paint into the glass and swirl it around to cover the inside, but I found that method wasted too much paint.
- After a couple coats, you should be done. Voila!
Sunday, March 11, 2012
Tissue Paper Flowers-Think Daffodil

There are a BUNCH of tissue paper flower tutorials out there. Which is awesome, because they're sooo much fun to make. But, most tutorials are missing one tiny detail that can make all the difference in the appearance of your flower...
Tiny detail: Think Daffodil.
When you're separating the petals, pull them toward the center like a daffodil, especially the ends. Otherwise you'll end up with a fan shape. Now, the fan shape is still cute, but if you're going for the rosette, think daffodil. No need to expand here, check out the photos and you'll get the idea.

So, the next time you want to make tissue paper roses (and not fans), you know what to do.
Think daffodil!
Think daffodil!
Friday, January 13, 2012
Jan's Memory Tree

I thought I would share this cool project with you that I've been working on for the last week. A really neat lady is retiring this month who has worked at United Way for 40 years. We wanted to give her something she could display in her home to remind her of the lives she has touched over the years. One of my coworkers suggested something akin to a guest book tree (you know the ones with the blank branches that people put their fingerprints on to look like leaves).
I feel like the guest book tree is over-done, so I adapted the idea into an actual piece of artwork. We were going to be "collecting" thumbprints at Jan's retirement party and I was concerned that without a formal headcount, I wouldn't know how big to make the tree and may end up with too many branches and not enough thumbprints to make it look full and pretty. Painting an entire tree, leaves and all seemed like the best solution. That way, it didn't matter how many people showed up.

First, I painted a tree on a 24"x30" canvas in acrylics. You'll see that during the entire process, I continued to mess with the tree and the background, so it looks a lot different from the beginning to the end.

We wanted to add a sentiment to the painting, so I decoupaged a piece of tissue paper on the canvas and used washes of brown and pink paint to blend it in to the painting and add texture. If I ever do another memory tree, as I've named it, I will probably just paint the words across the bottom under the tree. But, this is how everyone liked it.

I added some white areas on the tree because we were going to use purple, Jan's favorite color, for the thumbprints and I wanted to make sure they would stand out against the green. So the white paint served as a primer to make the thumbprints pop.

Once everyone had added their imprint on the painting, I went back and painted over the white areas, messing with the tree some more, and it was complete!
I'm very pleased with how it turned out and Jan loved it. I call that a success!
Tuesday, August 16, 2011
Mini Address Book Tutorial

This is a great little rainy day project that's perfect for teens-- a fun way to spend the afternoon. I found these cute mini address books at Hobby Lobby for $2 just begging to be cute-ified! Have fun crafting it up!
Ingredients

scrapping paper
scissors
glue
felt pen (I use Sakura Microns)
adhesive laminating sheet- optional (I use Avery sheets)
mini address book
Prep It

The covers of the books have plastic-coating which doesn't like to stay glued to paper, so you'll need to peel that off first-- just the top layer, not the whole cover. Now you can cover your book with a cute paper of your choice. Then, set your little book under a heavy one for a bit while it dries.
Decorate It


After that, it's all up to you! I cut a strip of patterned paper and a few birds and leaves from the cover paper and made a little collage. Then I drew a few doodles and added a little "bookplate" on the inside cover. You could use stickers, ribbon, rubber stamps or rub-ons. Look around the house for cool stuff like magazine clippings, postage stamps and candy wrappers. It's a great way to reuse and recycle, plus it doesn't cost a penny!
Seal It

This step is optional. My address book is going in my purse, so I thought it would be a good idea to seal it so it doesn't get all crummy. Just cut a piece of the laminating sheet, stick it on your book, trim around the edges and rub it on really good with a spoon or something.
Share It- Gift It- Use It!
That's it! Wrap them up with a cute gel pen to give as party favors, a teacher's gift, a Secret Santa or for yourself! They would also be a fun activity for a girls slumber party. Afterward, they can pass them around and fill in their addresses and cell numbers, for emergency texting only of course (like who's crushing on who)!
*tip-- Hobby Lobby only keeps a few address books in stock at once, so if you plan to make several to give as gifts or need a bunch for a group activity, you can purchase larger quantities in packs of 12 here.
***Update-- it looks like the address books aren't available on the office supply website any longer. Try these Moleskine books or these Mead books instead. You can also use mini composition books which are super cute.

Today's Creative Blog's Get Your Craft On!
Friday, July 15, 2011
Crafty Sneak Peek!

Hi, chickadees! Sorry I've been missing lately. Summertime is certainly busytime around the nest! I've been working on some fun projects and plan to get some tutorials up in the following weeks. Here's a sneak peek of my latest crafty work in progress. Tutorial on the way!
Thursday, June 16, 2011
I love letterboxing! (Even though I haven't done it yet.)

Have you heard of letterboxing? It's like geocaching without GPS and Happy Meal toys. Basically, you use clues to find hidden boxes, each containing a logbook and rubber stamp. Armed with your own stamp, you make your mark on the book in the box and use the letterbox stamp to record your find in your logbook. Then you return the box to its home and make sure it is well hidden for the next finder.
To letterbox (I think it's a verb too), all you need is a personalized "signature stamp", a blank book and a pen to leave a note or record the date. Hand-carved stamps are especially prized, but if you're a newbie like me and lack in carving skills, you may want to start with a custom stamp. Either way, you'll definitely want a mark that is uniquely yours.
I sound like an expert, right? No? That's because I haven't started yet! I've just been learning all I can before I do. Check out the websites below. They taught me everything I know! (And I'm a poet, in case you didn't know it.)

This is our signature stamp. I tried to carve it myself, but I accidentally cut off noses and turned my head into a giant melon. So instead, I uploaded my drawing to RubberStamps.net and ordered a 2"x2" custom stamp. (The slashes at the bottom are to add the date.)

I also ordered 2 mini stamps of Molly and Max. These will come in handy if we come across a mini letterbox. Some letterboxes just have a little scroll or a miniature book enclosed, so I want to be prepared for those.
Letterboxes are hiding all over the world. In fact, there may be one living in a tree at your park right now! All you have to do to find it is go online, search the letterbox database, print out clues, gather your materials and start the hunt! To search for boxes in your area and for more tips and tutorials, go to Atlas Quest or Letterboxing North America.
Happy Letterboxing!
.
Thursday, April 14, 2011
Paper Carnation Corsages

I made these cute carnation corsages for my mom's party, Queen Bea's Birthday Jubilee. All the guests wore yellow ones and I made matching white ones for the hostesses to complement their yellow blouses. These are perfect for an afternoon tea party or bridal shower. Wouldn't they look so cute in shades of pink or blue for a baby shower? Or for all the moms at church on Mother's Day?
They are a bit time consuming, especially if you have to make a whole bushel of them, but they aren't difficult to make and the result is well worth it! They are so much nicer than regular ol' grocery store carnations. So, without further ado, on to the how-to! hee hee
Set it up!

To make the corsages, you'll need cardstock, tissue paper, scissors, glue, two kinds of ribbon no more than 1" wide-- with one slightly wider than the other, twist ties and bumble bee stickers. Start by cutting two 3" circles out of cardstock. You can use a small cup to trace the circle or use a circle cutter.
Back it up!

To create the backing, take your ribbons and cut two lengths of each about 3" long. Trim the ends diagonally to form the tails. Glue the ribbons onto one cardstock circle layering the narrow ribbon on top of the wider one. Glue the other circle on top lining it up with the circle underneath. Easy peasy.
Fold it up!

On to the flower... Cut six sheets of tissue paper into 5"x7" rectangles and make a neat little stack. Starting at the short end, fold the paper back and forth in an accordion fold about 3/4" wide.

Next, take your scissors and cut little triangles in the middle of each folded side. Wrap the twist tie snugly around the notches keeping the ends of the twist tie to one side. Trim each end into a scallop or v-shape.
Fluff it up!

Unfold each half of the flower like a fan. Holding the twist tie, lift the top tissue away from the others and pull it towards the center of the flower. To make room for each layer, gently un-tuck the petals all the way down to the base using your thumb and forefinger. If you accidentally tear one, don't worry-- the other layers will hide it.
Continue separating each layer in one direction so the flower has a flat bottom. Leave the last couple layers of tissue together so you have a sturdier base to glue to the backing.
Finish it up!

Next, fold the twist tie flat against the flower and glue the flower onto the cardstock backing. Add a little bumble bee sticker and you're done! Use corsage pins to wear the carnations. Soooo cute!
For an extra-special touch, you can personalize each corsage by putting an initial letter sticker on one of the tails like a homecoming mum! In fact, how cute would these be with little football stickers for booster moms at homecoming?! Oooo-- with stickers for the player's jersey number!

Linked up with:
Tip Junkie's Tip Me Tuesday
Running With Glitter
Don't Waste Your Homemaking
Thursday, April 7, 2011
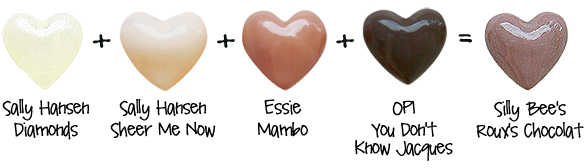
Silly Bee's Frankies- Roux's Chocolat


For my first franken, I wanted a go-to neutral with a little shimmer. I started with OPI's You Don't Know Jacques and added Essie's Mambo. Mambo added a rose undertone which is really pretty in sunlight. Sally Hansen's Diamonds created just the right amount of sparkle which added dimension to an otherwise boring neutral and Sheer Me Now lightened it up and brought it all together. The final mix ended up being just about equal amounts of each polish.
Named after Johnny Depp's character in the fabulous movie co-starring Juliette Binoche.

For a great tutorial on frankening, read Frankenpolish 101 on Dr. Frankenpolish's blog. A couple tips: wear gloves while you are working so you don't mess up your manicure and keep a pen and paper handy to keep track of your formula. Don't forget to name your frankies and keep your recipe with your nail polish stash. You just might need to make some for your bff so she'll stop stealing yours!
Look for more Silly Bee's Frankies in the future! I'll be sharing them with you as I make them. In the meantime, google "franken polish" and check out some other beautiful creations! Do you have any favorite franken formulas?
Subscribe to:
Posts (Atom)